Log in to edit your profile
Go to profiles.ucalgary.ca/user and use your CAS credentials to log in.
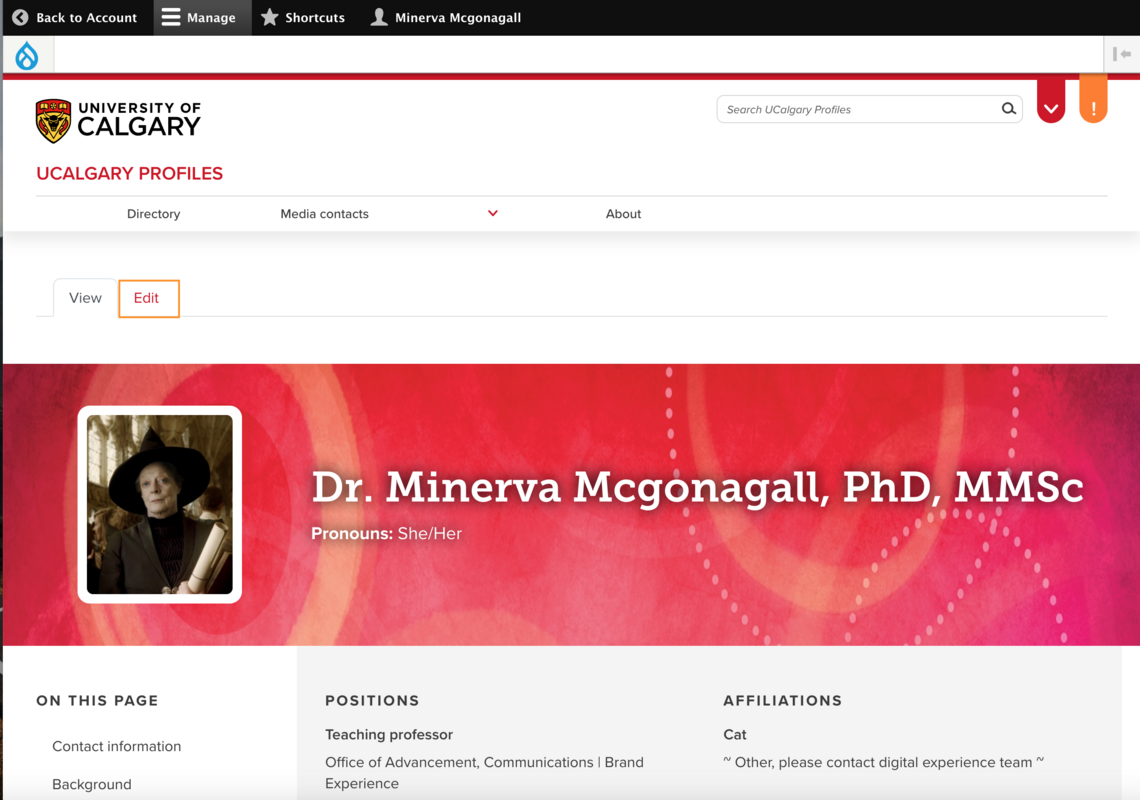
After logging in, you will land on your own profile page. From that page you can choose to edit your content by clicking the "Edit" tab above your name.
Profile header section
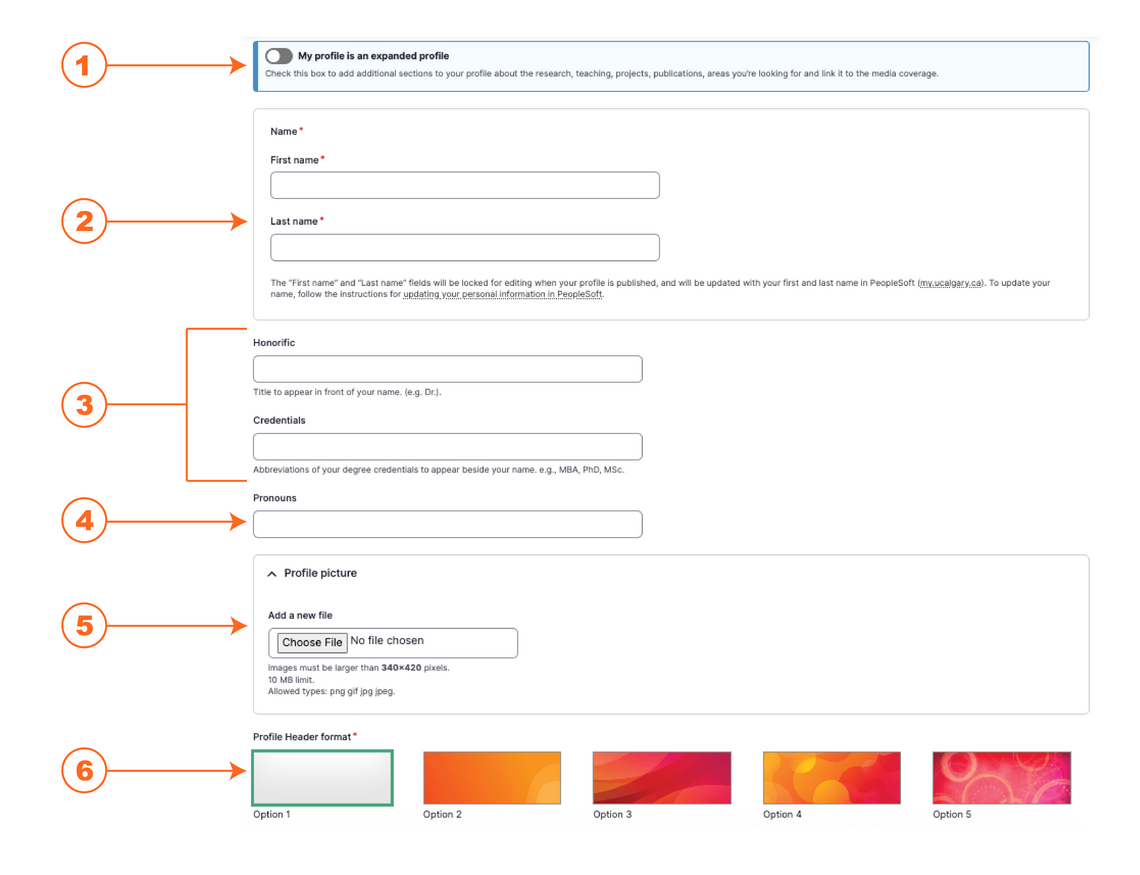
Once you have logged in and selected the "Edit" tab, you will see various fields for you to fill in. This first section of basic fields will be displayed as the header section on your profile page.
- Expanded profile checkbox: Check this box if you are a faculty member or researcher to enable specific fields for your profile including research and publications
- Name: This section includes fields for your first name and last name. When your profile is published, your first name and last name will populate using your name as it is listed in PeopleSoft. To update your name, follow the instructions for updating your personal information in PeopleSoft.
- Honorific and Credentials: Your honorific and abbreviated credentials will be displayed with your "First Name" and "Last name" to display as page title on your profile (e.g. Dr. John Doe, PhD).
- Pronouns: Your pronouns let others know your gender identity (she/her, they/them, he/him, etc).
- Profile Picture: This is where you can include your headshot by uploading it from your computer. The files must be larger than 340x420 pixels and must be a png, gif, jpg, or jpeg. The size limit for the file is 10MB.
We also suggest a portrait image for this section. - Profile Header: Choose from a selection of decorative images to display as the background for content on this section of your profile. If you do not want to have a decorative background on the header of your profile, you can use a generic background (option 1).
Profiles Content
These are accordion/expandable sections that allow you to populate your profile with more information. To edit a section, click on the text heading on the section, and the bucket will open up and allow you to begin filling in the areas.
Note: If you are a non-academic staff member, do not check the "Scholar profile" box and you will be shown fewer sections
By clicking the links below, you can jump to a section to learn more about it and how to edit it:

Positions and Appointments
This section allows to to add your job title and your department/business unit. You also have the ability to add multiple roles with the university if you have several roles or appointments.
Adding a Role: Click the "Add a role" button to allow additional Position/Appointment and Department/Unit fields to pop up. Now you can enter your role and department into the fields.
Removing a Role: If you need to remove a section containing a role and department, you can click the "Remove" button in the top right side of the field to remove the field. After you have removed the fields, click "Confirm Removal" to officially remove the item. If you do not confirm removal, the change will not be saved.
Selecting your faculty/unit: First, select your faculty or unit from the list provided. After selecting your faculty, a second drop down will appear. In this drop down, select your department or team from the list.
Re-ordering your list of roles: You can re order your list of roles by clicking, holding and dragging the drag and drop icon found beside the Profile - Role heading.
Updating a job title: To update a job title on your profile, delete all the existing text in the Job Title field you wish to update and type the updated job title into the blank field.

Contact Information
This section allows you to add your contact information to your profile. In this section, you can add the following information:
- Email address
- Phone numbers
- Web presence (websites, relevant social media links, google scholar, ect)
- Office or lab locations
- Media contacts
- Preferred contact methods

I'm Looking For
This section is only for Scholar profiles.
This section allows you to identify some things you are looking for as a researcher or faculty member.
Adding a section: To add an "I'm looking for" section, click the "add a section" button. Once you have clicked that button, more fields will pop up.
Type: This gives you the opportunity to select the category of things you are looking for. These are displayed in a dropdown selector with the following:
- Funding
- Learning opportunities
- Research partners
- Study participants
Description: This text area allows you to type in the specifics about what you are looking for.
You can add additional sections if you are looking for multiple areas.

Background
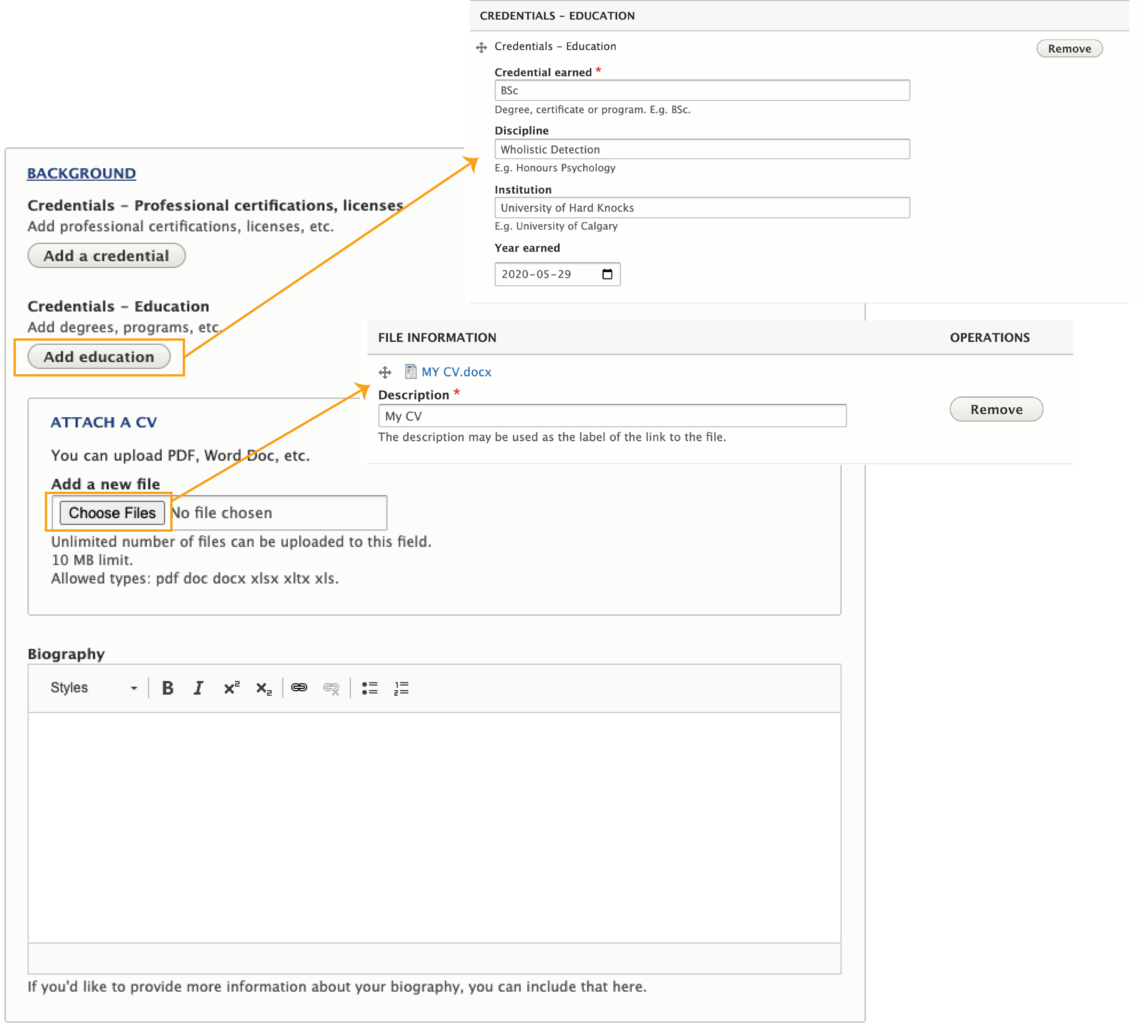
In this section, you can add professional certifications and licenses, degrees and programs you have completed, and a copy of your CV(s).
Adding a Professional Certification or License: If you have certifications you would like to include, click "Add a Credential" under the Professional Certification or License section. Three fields will pop up so you can add the certification title, granting organization, and the date of completion.
Adding your Education: If you have degrees you would like to include, click the "Add education" button. Four fields will pop up where you can add your degree, field, and institution, as well as the year of completion.
Attaching your CV: To attach your CV, click "Choose files". Your computer's file browser will open and you can click your CV file to upload it. Once you have uploaded your file, add a descriptive title that will appear as the link to your file. If you have several CVs to add to your profile, you can continue the same process after your first file is uploaded.
Adding your Biography: You can add your bio by typing directly into the field or by copy and pasting your bio from another source. You can also use the basic styling functions at the top of the field if you desire.
Research
This section is for scholar profiles only.
This area is where you will put your research interests and themes as well as tying into the the universities strategic initiatives.
University strategic initiatives: Check off all the boxes that your research relates to.
Faculty-specific research area: Use the drop down selector to select which faculty you belong to. Once selected, a list of your faculties research areas will pop up. From there, you can select which ones are applicable to your research interests. This information will not appear on your profile, but will make your profile searchable and filterable in these ares. If you belong to multiple faculties, you can add a section by selecting "Add faculty research areas". Note: this section is set up by individual faculties, and not all faculties may be using this feature.
Research interests: This area is where you can add and describe your own research interests. By clicking "Add a research interest", additional fields will appear for you to fill in a title and description. You can add more research interests as necessary. Be sure to use a descriptive title for the title section, for example: Use: "Animal Health" rather than "Research Interest: Animal Health".

Here is an example of how research interests appear in a profile list:

Teaching
This section is for scholar profiles only.
If you are an instructor or professor, you can add your courses in this section.
Adding a course: Click the "Add a course" button to add a course. You will additional fields appear so you can fill in your course number, course name, and term.
You can add additional courses by clicking the "Add a course" button until you have filled in all your courses.

Projects
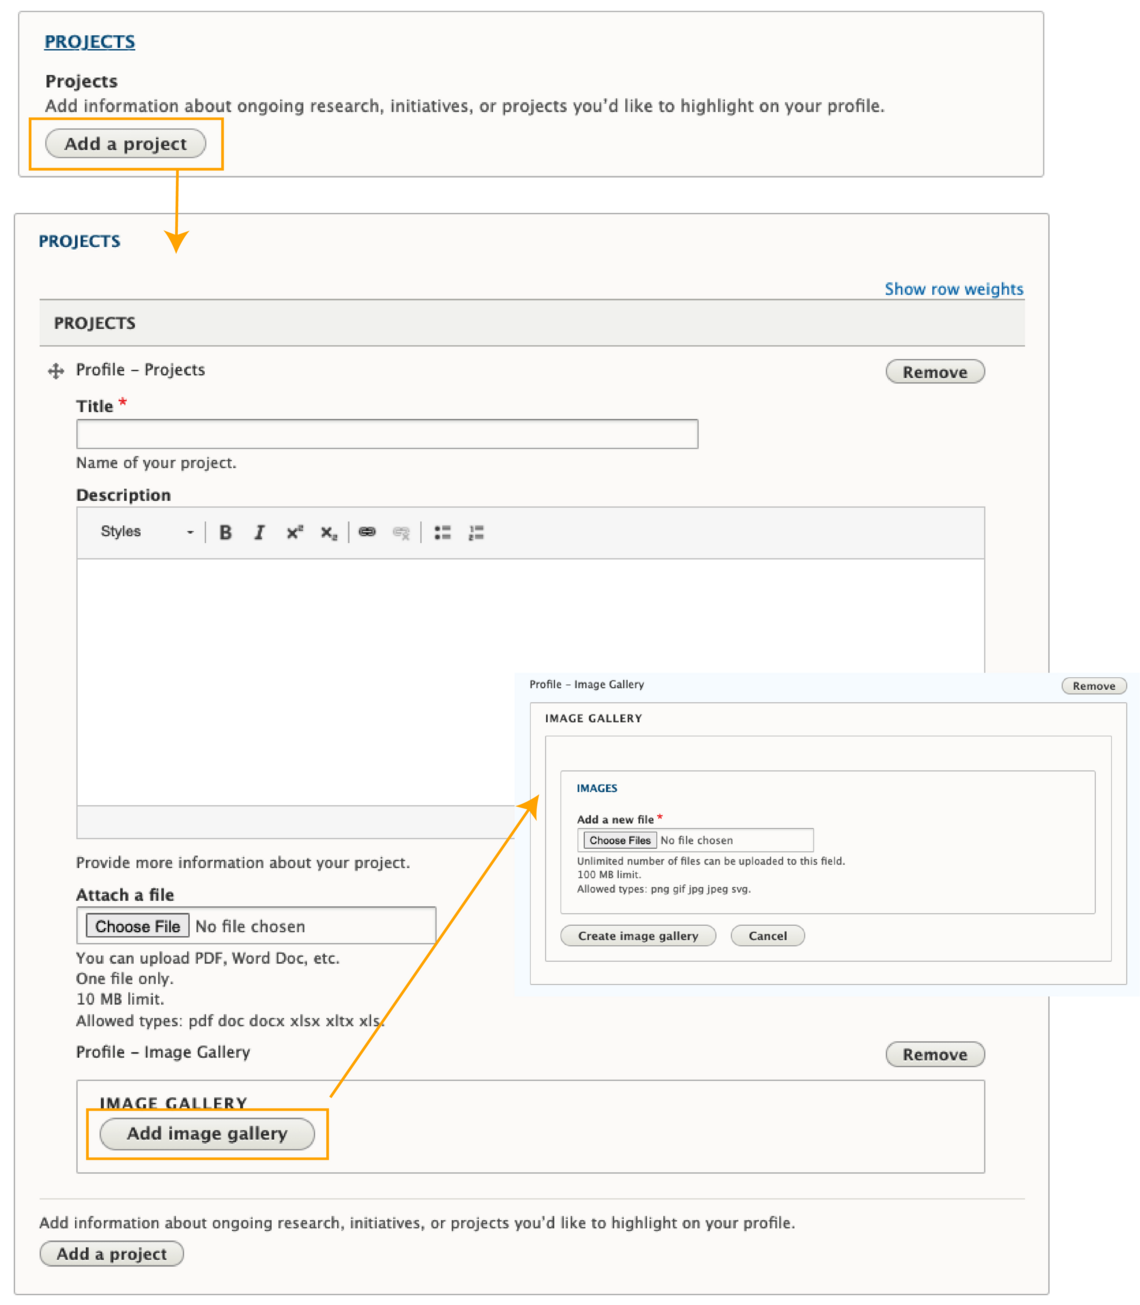
In this section you can add information about ongoing projects. To get started adding a project, click the "Add a project" button, and several fields will appear.
Title and Description: The first two fields are title and description to help you tell everyone what your projects are about.
Attach a file: If you have a piece of documentation to accompany your project description, this is the spot for it! By clicking "Choose file", your file browser will appear, allowing you to select and upload your file. Once you have uploaded it, you will need to add a description to the file to serve as the link title for the file.
Image Gallery: If you have multiple images of or about your project, you have the option to add them to this photo gallery section by clicking "Add new custom block".
- The file uploader will appear and you can click "Choose files" and select your first image.
- Once you have picked an image, you can add additional details about your image such as: Media caption, Media credit, Alternative text (required), Media Caption URL.
- You can crop your image to your desired size.
- Continue to upload as many images as you need.
- Once all your images are uploaded and all the information is filled in, you will finish creating the gallery by clicking "Create custom block" at the bottom of the section.
After adding all the information about your project, you can add additional projects by clicking "Add a project" at the bottom of the section.
Awards
This section allows you to showcase the awards you have received. You can add multiple awards to this section and they will be organized into accordion buckets.
You can add additional awards by selecting "Add Awards" and filling in the information. After adding awards, you can re-order them using the drag and drop icon at the top left corner of the section. You can also remove entries by clicking the "remove" button in the top right corner.

Publications
This section is for Scholar profiles only.
If you are faculty or a researcher, this is where you can add your publications to have them showcase on your profile.
Chose a format: To start, you have to decide how you want your publication to be displayed. You have a choice between a list format and an accordion format. Use the radio buttons to choose either "Display as list" or "Display as accordion sections".
Publications: Click the "Add a publication" button and the input fields will appear on your screen. From there, you can fill in the:
- Type from the drop down list
- Publication title
- URL
- Publisher
- Identify your pages of the publication
- Add author and co-author information
- Year of publication
After inputting all the relevant information, you can add another publication by clicking "Add a publication".
After entering all your publications, you can also add a link to your external publication lists (Google scholar, Scopus, PubMed, ect.) If you would like to add several links, click "Add link" under the fields.

In the News
This section is for Scholar profiles only.
In this section, you can add news articles that feature you or your work.
Media Coverage: Click the "Add media coverage" button
Enter information: Enter the following information:
- Title/Topic: Enter the headline here
- Date published: You can either type in the date using the YYYY-MM-DD format or use the calendar selection tool by clicking the calendar icon.
- Forum/Network: What outlet put out the article?
- URL: Link to the article
Add additional articles by clicking "Add media coverage" at the bottom of the section.

Additional Information
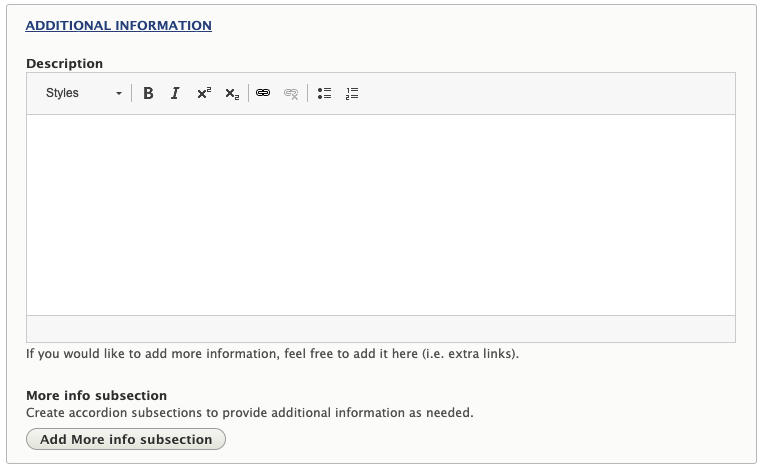
This section allows you to write in any more information you would like to add to your profile.
You can add multiple sections by clicking the "Add More info subsection" and the additional info will be displayed in an accordion format.
Saving and Publishing
One you are finishing adding your information, or just want to save your profile for good measure, you will be able to do so at the bottom of the editing page.
Saving: To save your changes, click the blue "Save" button. After clicking save, you will be brought back to the front end of your profile.
Publishing: To publish your profile and make it public facing, check off the "Publish" checkbox. Make sure you save your profile with the blue "Save" button for the page to publish.
*If you're not ready for your profile to be public facing, make sure you have not checked off the "Publish" box.


